Difference between revisions of "Compiling using Microsoft Visual Studio"
| (2 intermediate revisions by one other user not shown) | |||
| Line 1: | Line 1: | ||
| − | Microsoft Visual Studio 6.0, | + | Microsoft Visual Studio 6.0, specifically Microsoft Visual C++ 6.0, may be the most popular priced C++ compiler for Windows ever. Having been around for over eight years, it has quite a large following. |
== Before you compile... == | == Before you compile... == | ||
| Line 6: | Line 6: | ||
=== Visual C++ 6.0 === | === Visual C++ 6.0 === | ||
| − | [[Image:visualc6_includes.png]] | + | [[Image:visualc6_includes.png|thumb|Setting up Visual C++ 6.0]] |
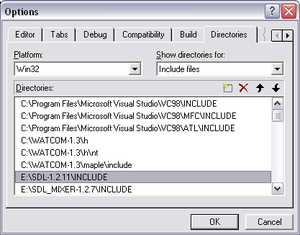
Go to Tools->Options... and click on the Directories tab. From there, add the \include directories from our required libraries under Include files and the \lib directories from our required libraries under Library files. Then, click OK. | Go to Tools->Options... and click on the Directories tab. From there, add the \include directories from our required libraries under Include files and the \lib directories from our required libraries under Library files. Then, click OK. | ||
Latest revision as of 01:37, 17 June 2007
Microsoft Visual Studio 6.0, specifically Microsoft Visual C++ 6.0, may be the most popular priced C++ compiler for Windows ever. Having been around for over eight years, it has quite a large following.
Before you compile...
Before we can compile Odamex, we must set up our environment to find our libraries.
Visual C++ 6.0
Go to Tools->Options... and click on the Directories tab. From there, add the \include directories from our required libraries under Include files and the \lib directories from our required libraries under Library files. Then, click OK.
Compiling in a nutshell
Once our environment is set up, compiling in Visual C++ is straightforward. Simply load the Visual C++ workspace file (odamex.dsw) and select the project which you wish to compile under Project->Set Active Project. Then, go to Compile->Build and wait for the compilation to finish.
